Imperative vs. declarative rendering of user interfaces
Why is React called “declarative”?
Many articles, tutorials, docs and books talk about imperative or declarative ways of doing things. APIs are designed in one way or the other. But what does that actually mean?
In this article I contrast React’s declarative approach with jQuery’s imperative approach, thereby explaining what declarative and imperative actually mean in this context.
At last I give an example of how the most popular routing library for React Native react-navigation moved from an imperative api to a declarative api to foster our understanding of the terms.
Table of contents:
Definitions
- Imperative: Give step-by-step instructions on how to reach a certain goal.
- Declarative: Describing the result (the what), without instructing how to do it.
Non-code example:
-
Mom wants a kid to tidy up its room.
- Imperative: “Pick up the toys, then empty the bin, then remove dust and finally vacuum the floor.”
- Declarative: “Here’s a picture of how your room looks like clean. I want you to get it into that state in 30 minutes.”
 Photo by Igor Starkov on Unsplash
Code comparison: Rendering
After looking at code examples we’ll define the terms more carefully. But let’s first jump into code.
How are html elements conditionally rendered in the browser?
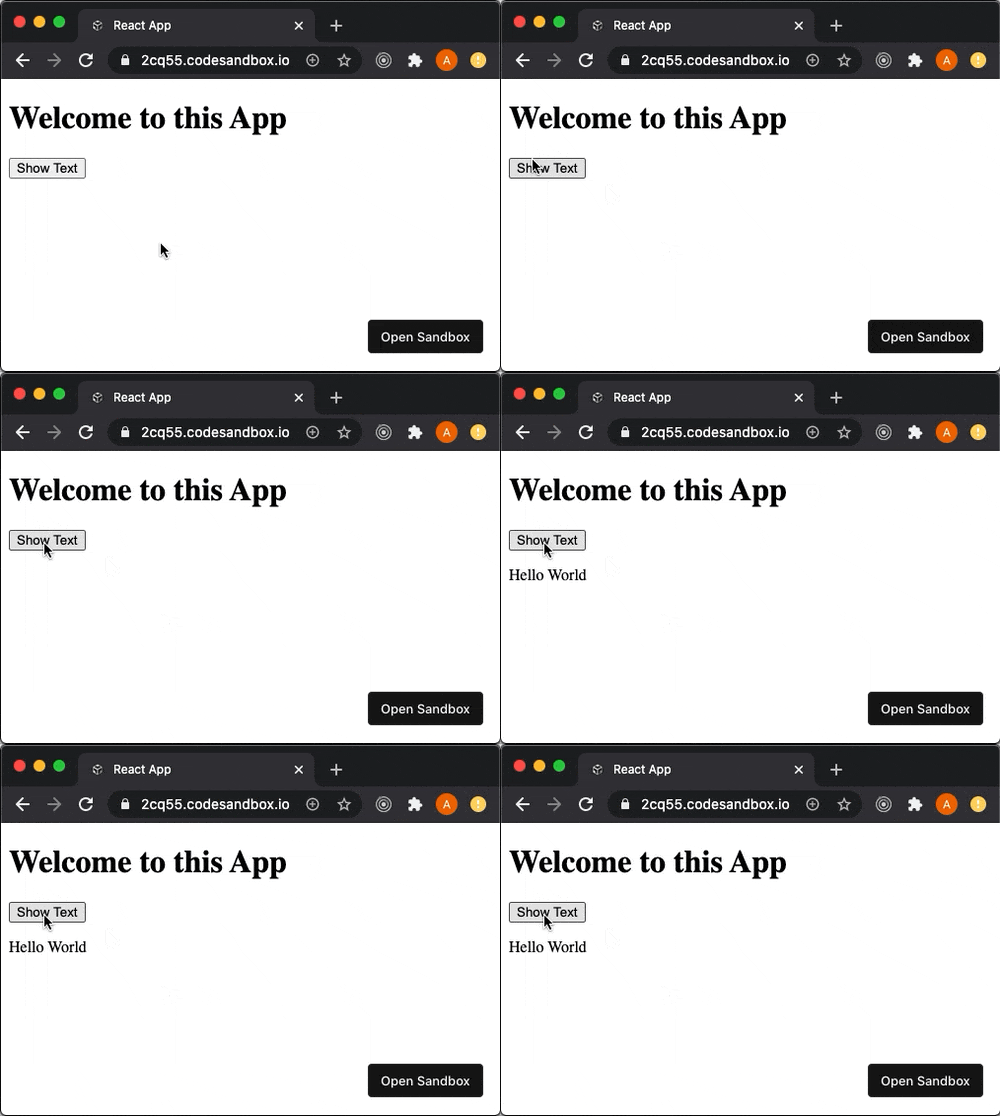
In other words: Given a condition (for example “button has been pressed”), render or don’t render a certain html element (i.e. a paragraph containing the string “Hello World”: <p>Hello World</p>). That’s how our app looks like:

Let’s take a look at an imperative way and a declarative way of implementing it:
Imperative (jQuery)
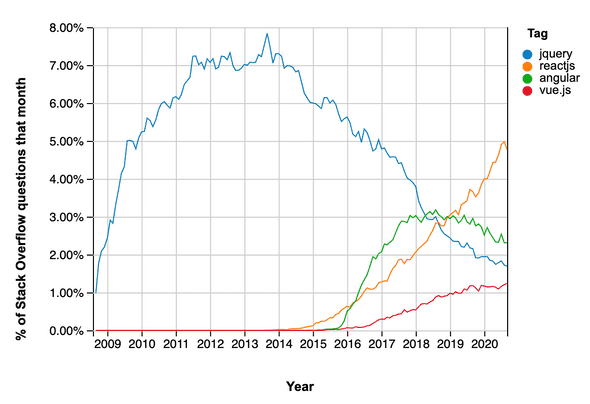
jQuery was the most popular JavaScript library (with its peak popularity between 2011 and 2015) as can be inferred from StackOverFlow question trends which shows that until mid-2018 more questions were asked about jQuery than for React:

jQuery follows an imperative approach when it comes to manipulating whatever is displayed in an html user interface.
The html code of the user interface you saw in the above gif is very simple.
<body>
  <h1>Welcome to this App</h1>
  <button>Show Text</button>
</body>
After clicking on the button, the html body looks like this (line 4 got added):
<body>
  <h1>Welcome to this App</h1>
  <button>Show Text</button>
  <p>Hello World</p></body>
We’ve got some interactivity here so we need to add some JavaScript code to control our html markup. This is how it can be achieved with the JavaScript framework jQuery:
-
Hide paragraph from the rendered DOM:
The
ptag which should only be visible after clicking on the button is hidden with the CSS ruledisplay: none;:<body> <h1>Welcome to this App</h1> <button>Show Text</button> <p style="display: none;">Hello World</p> </body>Note: As compared to the CSS rule
opacity: 0;,display: none;makes sure the element is not at all in the DOM and does not take up any screen space. -
Add JavaScript instructions of actions to take so that
pis displayed right after the user pressed the button.In this case there’s only one action to take/instruction to give (i.e.
$('p').show();) if the button was clicked ($defines/accesses jQuery):$('button').click(() => { $('p').show(); }); -
We add the JavaScript code as a
scriptto thehtmlcode which gives us:index.html<!DOCTYPE html> <html> <head> <script src="https://code.jquery.com/jquery-3.5.0.js"></script> </head> <body> <h1>Welcome to this App</h1> <button>Show Text</button> <p style="display: none;">Hello World</p> <script> $('button').click(() => { $('p').show(); }); </script> </body> </html>- Play around with the code in this CodeSandBox.
Alternative (more “imperative”) solution
To more clearly showcase the imperative nature used in jQuery, let’s look at this other solution.
-
We start with the original html code:
<body> <h1>Welcome to this App</h1> <button>Show Text</button> </body> -
We add an
onclickhandler with a callback function (calledappendText) to thebutton:<body> <h1>Welcome to this App</h1> <button onclick="appendText()">Show Text</button></body>Note: The
<p>Hello World</p>line is not even present here. -
Implementing the
appendTextcallback function-
We create a
pelement and fill it with the string “Hello World”:var txt = document.createElement('p'); txt.innerHTML = 'Hello World'; // Create text with DOM -
With
$('body')we get hold of the htmlbodyDOM element and canappendan element as it’s last child.var txt = document.createElement('p'); txt.innerHTML = 'Hello World'; // Create text with DOM $('body').append(txt); // Append new elementNote: This is a list of three imperative steps!
-
We encapsulate this logic into the
appendTextfunction:function appendText() { var txt = document.createElement('p'); txt.innerHTML = 'Hello World'; // Create text with DOM $('body').append(txt); // Append new element }
-
-
Combining JavaScript
scriptand thehtmlcode we get the followingindex.htmlfile:index.html<!DOCTYPE html> <html> <head> <script src="https://code.jquery.com/jquery-3.5.0.js"></script> <script> function appendText() { var txt = document.createElement("p"); txt.innerHTML = "Hello World"; // Create text with DOM $("body").append(txt); // Append new element } </script> </head> <body> <h1>Welcome to this App</h1> <button onclick="appendText()">Show Text</button> </body> </html>- Play around with the code in this CodeSandBox.
Declarative (React)
Let’s create the same UI with React which uses a declarative approach:
-
With React the
htmlmarkup is modeled via a virtual DOM written in JavaScript.The following
h1andbuttonelements are not html elements but React elements (written in JSX):JavaScript<h1>Welcome to this App</h1> <button onClick={() => setDidPressButton(true)}>Show Text</button> {didPressButton ? <p>Hello World</p> : null} -
The
pelement which will only appear after the button was pressed is added as such:JavaScript<h1>Welcome to this App</h1> <button onClick={() => setDidPressButton(true)}>Show Text</button> {didPressButton ? <p>Hello World</p> : null}- Line
3describes how the DOM will look like given one of two states. - More precisely line
3uses the conditional ternary operator to render<p>Hello World</p>if the button was pressed, butnull(i.e. nothing) if the button wasn’t yet pressed. - Thanks to React there is no separation between
htmlmarkup andJavaScriptlogic anymore.
- Line
-
We still need to add logic so that the
didPressButtonvariable gets the right value assigned:To this end we add the
didPressButtonlocal state with theuseStatehook in line4and set the value totruewhen the button is pressed in line8:App.jsimport React, { useState } from 'react'; const App = () => { const [didPressButton, setDidPressButton] = useState(false); return ( <div className="App"> <h1>Welcome to this App</h1> <button onClick={() => setDidPressButton(true)}>Show Text</button> {didPressButton ? <p>Hello World</p> : null} </div> ); }; export default App;- Play around with the code in this CodeSandBox.
Verdict: imperative vs. declarative
Imperative (jQuery)
-
The second jQuery example contains step-by-step instructions on how to reach a certain goal which makes it imperative:
function appendText() { var txt = document.createElement('p'); txt.innerHTML = 'Hello World'; // Create text with DOM $('body').append(txt); // Append new element } - Such step-by-step instructions might seem more straightforward than a
conditional ternary operatorplus auseState hookas used in React. -
BUT it’s difficult to reason about the code!
The html markup is the following:
<body> <h1>Welcome to this App</h1> <button onclick="appendText()">Show Text</button> </body>Problem:
- This does not give any indication of a third element which is conditionally added to the DOM!
- How does the DOM look like given a certain state? Difficult to say because JavaScript instructions are separated from the description of the DOM (the app’s structure described using
htmlcode) - Verdict: Code which is hard to grasp.
Declarative (React)
-
You describe the what, without instructing how to do it.
JavaScript<div className="App"> <h1>Welcome to this App</h1> <button onClick={() => setDidPressButton(true)}>Show Text</button> {didPressButton ? <p>Hello World</p> : null} </div> - The structure of the app is described in front of you.
- No instructions on how to manipulate the DOM must be given. Instead React automatically triggers an update of the DOM when the value of
didPressButtonchanges. - How are the DOM updates realized? - That’s hidden behind the curtains of React.
- Verdict: Safer and easier to extend.
Every computer eventually needs imperative commands
The computer eventually needs a sequence of imperative commands. The programming language or framework just hides it from the developer.
That’s what React’s virtual DOM does. It creates a new copy of a virtual DOM tree (created from the JSX code) every time something changes. It compares this new virtual DOM tree with the one from before and mutates the parts of the browser’s DOM which actually changed.
React Native example: react-navigation
The most popular navigation library of React Native react-navigation moved from an imperative approach (version 4) to a declarative approach (version 5).
Let’s look at the example of an authentication-flow. For the following examples, the login/logout status is stored in a globally accessible state variable named isLoggedIn.
Imperative version 4
-
Given a certain login/logout status or event you imperatively instruct the app to navigate to certain screens.
-
When a user opens the mobile app, you check the login status (which is stored in the global state variable
isLoggedIn). If the user is logged in, you navigate to the Home screen and if the user is not logged in, you navigate to the Login screen:const onStartup = () => { if (isLoggedIn) { navigation.navigate('Home'); } else { navigation.navigate('Login'); } } -
When a user logs out you again imperatively instruct the app to go back to the login screen:
const onLogout = () => { navigation.navigate('Login'); } - Cumbersome and error-prone: You have to manually implement all the navigation changes which are triggered by the login state changes.
-
Declarative version 5
-
You declare which Screen (
LoginorHome) is shown dependent on the global login state (stored in the global state variableisLoggedIn) of your app (using theconditional ternary operator):<Stack.Navigator> {isLoggedIn ? ( <> <Stack.Screen name="Home" component={HomeScreen} /> <Stack.Screen name="Settings" component={SettingsScreen} /> </> ) : ( <Stack.Screen name="Login" component={LoginScreen} /> )} </Stack.Navigator> - Easy to reason about: You don’t have to imperatively instruct any navigation change in code. The declarative description makes sure that the correct screen will be shown depending on the
Further reading
I hope you now have a better grasp about the difference between imperative or declarative programming approaches. I struggled for quite a while to really understand their differences.
If you want to read more, I can recommend the following articles which helped me while writing this article:
- Imperative vs. declarative - Pros and Cons.
- Is jQuery imperative?
- Complete guide to declarative programming
As always I’m happy to hear your thoughts and comments below!
Discuss on Twitter ● Improve this article: Edit on GitHub